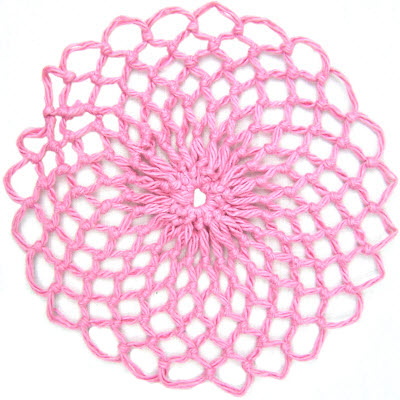
I thought I had just about finished the edgings and borders found in Tatting and Netting. Then I looked through the book one more time and found at least 19 more patterns. Some of the edgings are attached to other items like shawls or handkerchiefs. Some of them are scallops, half circles that can be made separately and attached one at a time to the edge, and there was even an insertion that could be used as an edge. I decided not to include the edges of the mats or doilies. I have updated the list of edgings to include all 38 edgings from Tatting and Netting.
As I was looking at the scallops, my eye caught the one on page 116, Netted Lace.

"Make 12 stitches with a rather coarse bone needle, on the foundation loop, then, with a little smaller needle, make 2 stitches in every loop. Next, make 3 rows with a rather coarse steel needle, then 1 row with the bone needle, but in every other stitch put the thread over the mesh twice. Next row, use the quarter-inch mesh, and make 1 in every stitch; then make 1 row with the largest bone needle, and make 2 stitches in every loop. Draw up the work with the foundation thread to form the scollop, and tie it tightly."
Unfortunately, the directions were not as clear as I expected.

It took me fout tries to get my sample close to the photo in the book. The instructions for the 6th row said, "then 1 row with the bone needle, but in every other stitch put the thread over the mesh twice." I thought that meant to skip a loop. When I finished I could tell that the 6th row was wrong, as well as the 8th row. The closed loops were too long in that last row.

I tried again and got the 6th row to look correct, but I overcompensated on the 8th row and made the open loops too long. I also realized that the photo did not have the small closed loops all the way across the row. There were four loops in the middle that did not have the small loops.

My third attempt I messed up again on the 6th row by making a long loop first, though I remembered to avoid making the small loops in the center of the shell.

Finally I remembered to do everything right. It looks slightly different from the one in the book because I pinned the loops out tightly.
As I look at these four samples, I realize each of them would look nice as an edge. I just happened to want it to look like the one I saw in the book.
The directions I used for the last sample are as follows:
Row 1: Using a 3/8" flat mesh stick, form a grommet with 12 loops, but DO NOT tie an overhand knot to form the final loop. (12 loops in the row)
Row 2: Turn the netting over and, using a #5 knitting needle, net 2 knots in each loop. (24 loops in each row)
Rows 3-5: Turn the netting over and, using a #3 knitting needle, net 1 knot in each loop. (24 loops in each row)
Row 6: Turn the netting over and, using a #5 knitting needle, net 1 knot in the first loop, wrap the thread around the mesh stick before netting 1 knot in the second loop, *net 1 knot in the next loop in the usual manner, wrap the thread around the mesh stick before netting in the following loop*; repeat from * to * across the row. (24 loops in the row; 12 short, 12 long)
Row 7: Turn the netting over and, using a 1/4" flat mesh stick, net 1 knot in the long loop, *net 1 knot in the short loop, net 1 knot in the long loop*; repeat from * to * across the row. (24 loops in the row)
Row 8: Turn the netting over and, using a #5 knitting needle, *net 2 loops together, net 1 more knot in those 2 loops*; repeat from * to * 2 more times, net 2 loops together 4 times, repeat from * to * 4 times, net the last 2 loops together.
* * * * * * * * * * * * *
In our family, names are drawn each year for Christmas, and we give presents to the child whose name we have. If that child has children, we can either give something to the entire family or each person. In November we visited my mother-in-law since her health was failing and we wanted to go while we could still visit with her. One of my daughters lives near her, and it was this daughter's family that we were to give Christmas presents to.
My daughter had just been reading to her children about the dolls for which my grandmother had crocheted dresses. There were even pictures of the dolls in the book she was reading. As children, we had been allowed to choose one of Grandmother's dolls. My grandchildren wondered if I could do something like that for them. So, during our November visit, we went on-line and they each chose a doll. We ordered the dolls and a book that gave correctly-sized patterns. I could not remember how tall my doll was, I knew it was not a barbie doll, so we selected dolls that looked close to mine with movable eyes, a face they liked, and 15" tall.
The dolls and patterns arrived soon after I returned home, and I was surprised to see how tall the dolls were. I measured the one my grandmother had given me - it was about 12-13 inches tall. I began crocheting. By the time we returned for my mother-in-law's funeral last week, I had the dresses done to the point where the ruffles began.
By crocheting almost non-stop after the day of the funeral (at the grandchildren's request, they did not want me to play games or read stories to them), I finished just before we flew home on Thursday. There were things I did not get done, but the basic dresses were finished. And that was what was important!

This past month I have learned why I like to net or, to say it another way, why I do not like to crochet.
Reason 1: GAUGE! To work with size 4 knitting yarn, the pattern called for a size F hook or whatever hook was needed to obtain the correct gauge. I needed to use a C. To work with fingering yarn (size 2 yarn), I was to use a size B hook. I used a size 8. I usually use size 8 for crochet thread. For the bodices especially, I needed to be very careful to stay on gauge, which meant my fingers and shoulders were tense. I could not relax.
Reason 2: The motion of crocheting is also harder on my wrist than the motion used in netting. The last day I could feel a few twinges in my wrist. It felt good to relax my right hand and wrist on the flight home by netting on the doily I am currently trying to finish.